Showing posts with label quick sew. Show all posts

Saturday, May 10, 2014

Simple Ribbon Headband Tutorial


It took me over a year, but I've finally put together a tutorial for the ribbon headbands! These are super simple and quick, and would be a great beginner sewing project. You can use any width of ribbon you'd like, depending on what kind of look you prefer.


I [obvoiusly] used Scandinavian ribbon. You can find a variety of Scandinavian-style ribbons on Etsy [TrimKo has quite a few options], or you can buy whatever type of ribbon you find cute at Michael's or Jo-Ann Fabrics.

You will need:
15 inches of ribbon (width of your choice)
15 inches corresponding width, backing ribbon (I used plain black/navy grosgrain)
5 inches of 1/4" thick black elastic
Scissors
Invisible thread (not pictured)

Note: These headbands are made "one size fits most". Shorten your elastic length if you are making a headband for a very small child.


To start, place the wrongsides of your main ribbon and backing ribbon together.


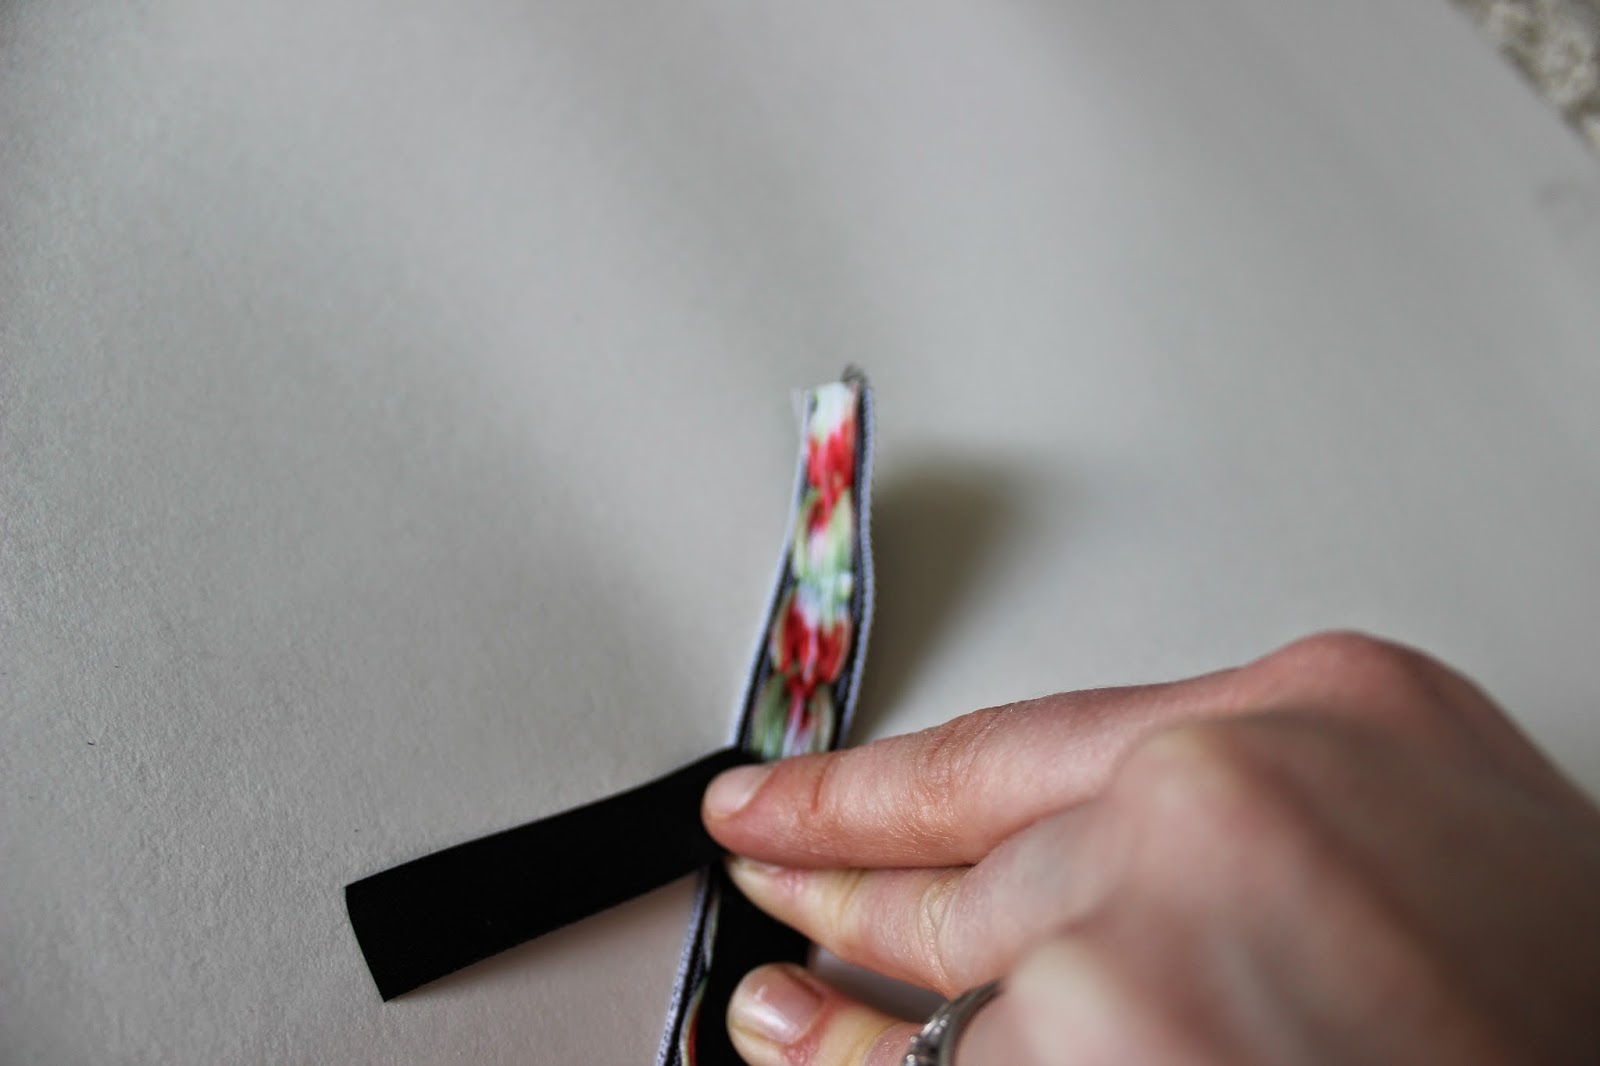
Fold under the end pieces of the ribbon 1/2", and tuck 1/2" of your elastic between the two ribbons. Secure with pins and sew back and forth over the elastic, using your invisible thread. You will want to make sure you do this around 4 times to ensure your elastic won't fall out.


Once your elastic is secured on one end, sew along the outside edge of both sides, sewing together the two pieces of ribbon. Leave a 1-inch gap at the end so you can fold under the ends. Repeat the folding and elastic sewing on the other end. Make sure your elastic isn't twisted before you sew the other end! I may or may not of sewed a couple with twisted elastic...oops! 


That's it - now you can wear your new headband or give it as a fun gift!


And if you aren't feeling very crafty, you can always purchase one from my Etsy shop here!

Sunday, March 3, 2013

DIY heat pack

I have been meaning to make a quick, rice-filled, heat pack for quite some time now and today was the day it finally got made.  After one too many instances of needing one and not having one on hand, I finally perused through my fabric stash and decided to use this old Swedish fabric calendar as the fabric.

I forgot to take a picture of the calendar before I cut it up...so here it is just pieced together. 


A short while later and here it is! Filled with rice and sectioned off into 4 rectangles.  You can microwave the entire pack and the rice retains the heat.  Voila. Cheap DIY heat pack. I used this tutorial from the blog Fellow Fellow. I love that I finally found something to use the calendar for! 


It's been a great weekend.  I can't believe it's already Monday tomorrow. My how time flies. And it's March already?! Wow.  

Hope all is well!

Tuesday, February 14, 2012

A dress for a baby

First, Happy Valentine's Day!  Hurry for a day dedicated to eating chocolate and getting flowers!  I know I will definitely be eating my fair share of sweets today, I hope you do too.

Ok, back to sewing and crafting.  I made this wee little baby dress from Anna Maria Horner's book, Handmade Beginings, the dress is called the Pretty-as-a-Picture Dress.  A number of our friends are having babies in the near future and I thought I'd get a head start on some baby gifts! 

It uses one fabric to showcase the design in both the front and back of the dress.  I had this adorable porcupine fabric that I found in Japan and figured this would be a great use for it!


Back view: You can see how the elastic around the waistband (except for the front panel) gives the dress some cute gathers.


Front view:


And side view:


This was a great day project.  I started it in the morning and finished after lunch, with many coffee breaks in between.  I am loving Handmade Beginings, it has adorable projects for every aspect of parenthood: from diaper bags to maternity clothes to baby toys, a great range of things to create.

And if you're looking for a fun Valentine's day craft try making your own paper hearts with this tutorial:


Happy Chocolate Valentine's Day!

Monday, November 7, 2011

Easy Knit Pillow Tutorial


This is the project I have been working on this past week. Knitting away during my free time, it only took one week to finish knitting the front to this pillow. And I wasn't knitting very often, it went quite quickly. I love that it is a bit softer to lay on when I'm zoning out on the couch reading a magazine (November issue of Real Simple, anyone? So good.) and they are a bit bigger than the last pillows I made.

If you don't know how to knit it's no problem, you can repurpose an old wool sweater or buy one from a thrift store. If you do knit, I recommend using larger needles so the lining fabric can peek through.

Ok, let's get started! Gather your supplies:

One 17 x 21 inch stockinette stitch knit swatch
(I used size 15 needles, cast on 65 stitches and knitted until it measured 17")
One 17 x 21 inch piece of lining fabric
(I used white flannel)
One 17 x 21 inch piece of fabric for the back
Stuffing for the pillow
Needle/thread


1. Cut and assemble your layers of fabric. Lay your back piece of fabric right-side up and place your knitted swatch on top, wrong-side up.


2. Place your lining piece on top of your knitted swatch.


3. Pin in place. Leave a 3 inch gap in the bottom of your pillow.


4. Sew around the pillow using a 1/2 inch - 1 inch seam allowance. I used quite a big seam allowance here to allow for the knitted piece, feel free to adjust accordingly.


5. Turn right-side out through the gap you left in the bottom.


6. Stuff with filling. I start stuffing with the four corners and add gradually from there. Distribute evenly and keep in mind that it will flatten out a bit after use.


7. Pin the gap closed by folding in both sides 1/2 inch. Sew either using your machine or hand stitching with an invisible stitch.


Enjoy your soft and comfy knitted pillow!


Pin It

Thursday, September 22, 2011

Organizing a wall

I'm attempting to use up my stash of fabric (or at least make a dent in it) by making projects from the many craft books I've acquired over the years. So I decided to make a wall organizer from Lotta's Simple Sewing book.


We hung it on the wall right when you walk in the door. That way it's convenient to put any mail or coupons right in a pocket. I also threw some pens, tape, and scissors in some pockets too.

The only part I'm not quite happy with yet is the wooden dowel I used to hang it up, it's not quite long enough so the fabric bunches on either side. An easy fix but I need to go someplace that sells them.

It feels good to have a place for things to go when I walk through the door. I was tired of stacks of junk mail just sitting around and this does the trick. Yay for organizing!

Sunday, September 18, 2011

Sunday brunch and pillows

My favorite meal of the day is breakfast. Maybe it's all those years of my mom telling me it's the most important meal of the day, but I love it. Weekdays I always eat cereal or oatmeal, but on weekends...breakfast craziness ensues.

Today my dear friend Alisha is making her way over to break the fast with me and Ryan. I'm branching out and attempting baked eggs in tomatoes!

In the above picture, I've hollowed out 6 roma tomatoes by cutting off the very top and scooping the insides out with a spoon. Then I cut a bit off the bottom so they would stay upright in my casserole dish. I added some sauteed onions and spinach and will fill each tomato with eggs and then bake for 15 minutes at 400.

We'll also have oven potatoes and pumpkin bread I made yesterday. I'm trying to act like it's Fall out here in California even when it's sunny and hot everyday. Baking Fall things helps.

And in unrelated news, I whipped up some simple 16" square pillows yesterday for our couch. I started and finished while watching New Scandinavian Cooking on PBS (love this show!). One side of the pillow is solid black and the other is the patterned fabric. I need to make a few more yet, but thought I'd make a couple more interesting ones to pair with the basic look.


Monday, August 8, 2011

Easy-Peasy-Dala-Horsey Apron

I finally finished the tutorial I promised last week. It is seriously easy. The hardest part of this tutorial was trying to get the pattern figured out. Tricky stuff for a girl like me. But with the help of the friendly blogging world and deciding to just upload it to flickr, I finally figured it out!

So without further adieu, here it is!


You will need:
1/2 yard of Dala fabric (Carina's is super-duper-adorable)
Bias tape - 1/2" and 1/4" double-folded (1 package of each will do)
Pattern pieces here, printed and put together
Sewing machine/thread/scissors

Ok! Let's get started!

First, print out the linked pattern, assemble and cut. Pin the pattern and cut out your fabric.

Next, pin your 1/4" bias tape around the bottom and sides of the apron. You don't need to cut an exact amount of the bias tape. Just pin around and trim off any excess. Then, sew. Carefully. I'm usually a cheater when it comes to pinning things, but this part is actually crucial that you pin and sew it well. Take your time. You can use the 1/2" bias tape for this part too if you think it'll be easier.


Make sure when you're sewing that you're catching the three layers: front of the bias, fabric, back of the bias. The fabric easily slips out if you don't pin it well.

Lastly, [yes, it's this fast!] pin your 1/2" bias tape centered on your apron and across the top. Sew, sew, sew! Start at one end of the bias tape and sew shut along the entire edge, catching the apron section on your way to the other end.

Bake something Swedish. Think about Dalas. Enjoy.

And if you haven't yet, join in the Dala Craftalong!

Monday, July 25, 2011

Dala Tea Apron


Welcome! If you're not familiar with what's happening over here, you're in for quite a treat. Carina of Carina's Craftblog, Pam of Gingerbread Snowflakes, Hanna of iHanna, and myself are taking part in a Dala Horse Craftalong. And we want all of you to join in the Dala Horse fun! Create something inspired by the Dala Horse, anything you want and upload any pictures to the Flickr group here.

So, for my first Dala Horse project, I used this adorable fabric I found in Japan. I bought it not knowing what I would make with it.


[please forgive me for the horrible lighting of the following photos. Please also forgive the wrinkly nature of the fabric, I still don't have an iron yet!]


And I used up 1/2 of it making this apron.

[Yes, I am fake cooking in this photo]


This is one easy-peasy apron to make. Not only is it cute, but it's practical. I especially love wearing tea aprons when I'm washing dishes. If I had thought ahead to how much I love wearing tea aprons while washing dishes I would have added some oilcloth backing...alas, I just now am realizing this.


I'm working on a tutorial for this very apron, a scalloped-edge, easy-peasy, Dala Horsey apron. So you too can have yourself a Dala Horse apron. You could even use Carina's super-cute Dala Horse fabric!


Now, what else should I make with the leftover fabric? Hmmm...

Sunday, July 24, 2011

Dala Horse Craftalong!


Yup, you heard me right, a Dala Horse Craftalong! Pam of Gingerbread Snowflakes rounded up a few of us Scandinavian crafters to start a Dala Horse Craftalong! So together with Carina of Carina's Craftblog, and Hanna of iHanna, we will be conducting a fun craftalong with all of you crafty folks out there to join in!

So what is a craftalong, you ask? Well, this is how it will work. The 4 of us will all be blogging for a month about Dala Horse themed crafts and offering helpful how-to's and tips. And we're asking you to join in the fun by creating either one of our projects or create your very own! Then once you get started, upload some of your progress over at the Flikcr group here.

Here are a few Dala crafts that you may have seen here on the Pickled Herring before:


The felted Dala coaster


Please join in the fun! I am currently working on many fun projects including a Dala apron, a Dala hot pad, Dala coasters....and so much more! Pam has made some pretty impressive 3D Dala horses along with some ornaments. And Carina has a freakin' sweet Dala embroidery pattern to check out, and Hanna has some sweet photos of the actual city where it all started!

I can't wait to see what all of you come up with, please join in the fun!

Sunday, May 15, 2011

The random mid-May post

Hello folks. Long time no post!

I don't have much to post at the moment, but thought I'd share a few random tidbits with you. First - these little Swedish baby booties I made for my nephew:

And they are reversible! But, I'm sad to say that I only made 1 booty because by the time I finished it he had outgrown it. I still think it's pretty cute though.


Second item of business, this cross stitch piece my grandma has at her house, I love it. It reminds me of my grandma. I've been super into cross stitch these days, my mom found some of her old kits that she bought but never made so I've been plugging away at them. I'll post my progress one of these days.

Does anyone know where you can find a stamped cross stitch kit (that's a cute pattern? I love the old samplers but can't find any!!)? I can't find one for the life of me, and I'm usually pretty good at finding craft supplies. Hmmm...


And lastly, I'm getting married in one month to this handsome guy - woah baby!

(picture from the Tokyo airport, we hadn't slept in a while...)

Tuesday, February 15, 2011

A cute jumper for a cute niece

This is my 2nd project (1st one here) from the One Yard Wonders craft book I got for Christmas. It's a playful jumper/dress for my niece! Unfortunately, I can't take any pictures of her in it because I won't see her until I'm home from Japan (in less than 2 months, woah!).


This was a very straightforward project and the directions were fairly simple. It didn't take very long either, it could easily be finished in a day. The measurements for the elastic were a little big so I took off about 2 inches to get the jumper to the size I needed.


I've really been enjoying the One Yard Wonders book, it has lots of quick and simple projects. Not to mention it helps me think of ways to decrease my ever-growing stash of fabric. If you're into craft books, be sure to check out Rachel's month-long series over at her blog, Nest Full of Eggs, she's reviewing a different 2010 craft book everyday!

Tuesday, February 1, 2011

Staying warm

Everyone seems to be talking about "snowpocalypse" so I thought it only fitting to post about ways to stay warm this winter season.

Tip numero uno: wear a hat. You've probably heard the old saying that you loose 90% of your body heat through your head, too bad that's not true. Although I don't know the exact percentage of body heat lost, I do know it's important to wear a hat to keep your little ears from getting frostbite.


Ryan and I went to Nasu (a small mountain town in Japan) last weekend where the snow was piled high and the temperatures below freezing. Luckily, we had hats. Well, mine isn't technically a hat but it did it's job. So much so that I wanted to try making one.

I bought some fleece and got to sewing! I used my green knit one to make a pattern then cut, sewed, and added the rolled fleece flowers for a little decor.


What I love about these head wraps is you can wear them when you have a ponytail in. I usually am wearing a ponytail so these are perfect for me. But you can definitely wear them with your hair down too, it's a win-win.


I also love the button closure, I think it adds a little cuteness to the whole thing. What's also great is they are wide enough that it feels like you're wearing a hat, not just one of those ear bands that always slide off and don't keep you very warm.

The rolled flowers were super duper easy to make. I'm sure there are tons of tutorials floating around on how to make them if you google "rolled fabric flower". I just used 1/2" wide strips of fleece, twisted and rolled it into a flower shape while using hot glue to secure it as I went.

I made a couple extra so I used one bigger one to make this headband, ta-da!


Stay warm, stay safe and drink lots of coffee!