Showing posts with label garden. Show all posts

Wednesday, October 22, 2014

A little avocado tree

A few months back, after I ate a delicious avocado, I decided to look up how to grow an avocado tree from the pit. Lo and behold it was so simple (but it took quite a while...)! I used these instructions here which basically entails sticking toothpicks in the pit and keeping the bottom half submerged in water until the root starts to form. Some people seem to have luck with this happening in 2-3 weeks. Mine, however, took much longer - more like 2 months before the root really started to break through. But it was worth the wait!

After the root grew, I transplanted the pit to an outdoor pot. Then the growing really took off! It shot right up and leaves started sprouting!


And here it is today, much bigger and still growing!


While it will be years before any avocados will actually grow, it's really fun to watch the pit turn into a little tree. Keep it up little guy!


Hope you're having a lovely week!

Monday, April 22, 2013

Midsommar crowns

Here is a quick peek of what I've been working on lately...
 
 
These Midsommar crowns are made from silk flowers and floral wire. From some readers' suggestions, I'm making some to sell at the Kingsburg Swedish Festival (in less than a month! ah!). I think my favorite ones so far are the blue and yellow ones (shown below on the right).


Pricing things is always a bit tricky for me. How much do you think I should sell the crowns for? At the Cal Luthern Swedish Festival last weekend, they had a "make your own" Midsommar crown booth with fresh flowers (carnations, greens, and baby's breath) for $3. The crowns I made cost about $3-$4 in supplies, not including time spent on putting them together. Suggestions? 
 
In other news, I think I am finally going to bite the bullet and get a "real" camera! I'm saving up! So hopefully in the semi-near future my pictures on this blog will start looking a little better. :)
 
Happy Tuesday!

Monday, January 7, 2013

Project Patio

Happy Monday, everyone!  I hope you all enjoyed your weekend and the start of 2013!

I don't do new year's resolutions myself, but one of the things I want to do this year (ok, that kinda sounds like a resolution of sorts, no?) is to make our front patio of our apartment more homey.  I've posted a couple pics here and there of our patio over the year, but it's nothing to write home about.  It's actually quite spacious for an LA apartment and I have been meaning to decorate it more ever since we moved in...almost a year and a half ago! Oops. So here are some of the projects I'd like to tackle for our patio:

I think making your own coffee table out of wooden crates is an awesome idea. Becca, from DIY Vintage Chic, posted this great tutorial for how to make your own.  I was hoping I can score some free wine crates from somewhere. Or, just buy wooden crates and use Becca's idea of stenciling on a winery logo directly on the crate.  I could stencil wineries Ryan and I have been to.

I think this would be a great outdoor table.  Low-cost, cute, and practical.  I love that the crates double as a table and shelving.


Recyclart posts tons of great up-cycled projects. The table below actually turns out to be this product made by reSurface. But if I could come by some free wooden pallets this would be a cool table too.  Maybe a little more work than the crates though...I think I will stick with the crates unless it doesn't work out as planned.


Then as for the garden side of our patio, I'd really like it to be better organized.  And cuter.  Way cuter. Don't get me wrong, I think my little aloe plant is just precious.  But I think it'd be even more precious in one of these neat vertical garden planters.

Apartment Therapy, chock full of incredible-but-usually-really-daunting projects, posted about this nifty vertical garden idea:


And here's another version:

And even another:

Those are the two biggest projects I'd like to get done this year.  I'd also like to put up some lights out there. Perhaps these cute little guys:

source

Thank goodness for Pinterest! I don't know how I would have come up with these patio projects without it.

Any other patio suggestions? I'd like to put a little chicken coop out there too, but alas, I don't think our landlord would go for it. Someday.

Well, that's all for now.  Enjoy your week!


Saturday, June 2, 2012

Garden Magic

I think one of the reasons I love gardening is that it seems like magic.  One day you plant something in the ground, add a bit of water and TLC, and the next thing you know you have things to eat - magic!

We recently added this bunch of green onions to the patio pot.  I had bought them from the grocery for a recipe then read somewhere (probably Pinterest) that you can plant the ends and they will keep growing back.  Amazing.  We've used them so many times this may be my favorite kitchen scrap item I've planted.  Next to the green onions is our wily rosemary which I always forget to use.


Our newest plant is this cayenne pepper plant.  $1.50 at our local Do-It Center.  And after just a few short weeks we already have a couple peppers coming in!


And this is our Jalapeno plant from last summer!? Did you know that they fruit for more than one season? I sure didn't.  I was quite surprised that it made it through the winter and was even more surprised when I saw it flowering.  

  
And what you see below is that potato I planted a few months back - holy cow! Who knew potatoes grew such huge, leafy plants! I think there's actually a new potato growing underneath too...exciting.


Just another shot of the hugeness of the potato plant.


Sadly, both the onion and pineapple I planted (at the same time as the above potato) have died.  I think the pot I used for the pineapple was perhaps a bit small.  And the poor onion never recovered from the wind storm.  You win some you lose some I guess.  

My weekend has been off to a great start and I hope yours is too - happy weekend!

Friday, April 20, 2012

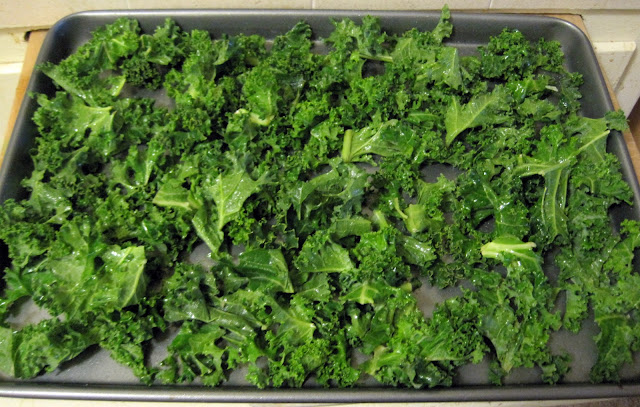
Kale chips

These are Ryan's and my new favorite snack.  I know the kale chip trend was a few years ago and I can't believe I waited this long to try them! They are so gooooood! Seriously people, so good.  

For any trendy-health-food-scoffers out there, these will actually impress you.  They taste like chips.  Maybe not like a tortilla chip, sure, but like a little crunchy piece of heaven in your mouth.  Ryan even loves them.  He tolerates normal kale when I put it in stuff, but these kale chips he actually enjoyed eating (!). 


They go from bright green to this:


Want to try them?

Take 1-2 bunches of kale and cut into 2-inch pieces.  Take out any thick stems.  Lay on a cookie sheet and spray a little olive oil  over them and toss.  I used my Misto (I love this kitchen item!) spritzer for this and it was like it was made for this purpose.  Sprinkle salt over kale.  Some recipes out there even jazz them up with some cayenne pepper or chili powder - I will try that next time. 

Bake at 300 for 20 minutes or until crisp.  Eat up!

Friday, April 6, 2012

Sprouting things

Good news, folks!  My little seedlings have sprouted! 

Welcome to the world little basil and chives.  And giant sunflower.  I completely forgot how sunflowers shoot right up.  I don't think I've grown one since kindergarten.  I even had to add a little popsicle-stick-support-system so they wouldn't fall over.  They are at least 6 inches tall already...after just a little over a week?! Wowzers. 


Also sprouting related, I attempted to sprout my own wheat berries to make some historical and nutritious Essene bread.  Major fail.  They were supposed to sprout within 48 hours and, after soaking them for a week, I'm certain they fermented instead of sprouting.  Bad wheat berries?  I don't really know what happened, but fear not, I will try it again!

Happy (early) Easter all!

Wednesday, March 28, 2012

DIY washi tape garden markers


Along with my kitchen scrap garden, I'm growing a couple more herbs and some sunflowers (a red variety that I've never seen before!) from seeds in some indoor pots.  I needed a quick way to tell them apart and I figured that washi tape would work perfectly for these little garden makers. If you don't have any washi tape on hand, masking tape would work just as well...just not quite as cute. 

It's so simple that I didn't even write any directions to go along with the following photos.  If anything is confusing, by all means, let me know.


Happy gardening! 


Since these probably wouldn't hold up in an outside garden, you should be sure to check out Astrid's great outdoor garden markers.  And these vintage spoons turned into garden markers are pretty creative!

Sunday, March 25, 2012

My little kitchen garden

First and foremost, please excuse the ugly and messy state that my patio is currently in.  We had a huge downpour of rain today and it has left some serious dirt, leaves, and the like spewed on our patio.

Secondly, I wanted to share a few items that I've planted over the past couple months, most of which have been from my kitchen scraps.


Here's a cute little potato that I had found sprouted in my produce bowl.  I cut off a section of the potato and planted it about 1.5 months ago.  Now there is a lovely little leafy thing going on.


Next up we have an onion (also found sprouted in the produce bowl) and a pineapple top.  The onion appears to have gotten beaten down by the rain.  I'm hoping that it doesn't die...yikes.  

But my favorite kitchen scrap plant by far is the pineapple.  I mean, who knew you could even plant one?!  Well, apparently a lot of people on the world wide web, but not me!  You just cut off the top with about 1-2 inches of the pineapple still on, then plant.  That's it!  I will eventually have to replant in a larger pot as they supposedly get rather gigantic.  And eventually it will even produce another pineapple!  


Today I started an avocado pit in my kitchen which I hope someday I have space to plant the tree.  And next I want to try to plant a sweet potato - I hear they grow a lovely ivy.

Hope you've enjoyed your weekend!

Monday, October 10, 2011

Homegrown happiness

Ryan and I have a lovely little patio that is perfect for a few potted plants. So far we have a rather large pot for herbs and a second, not so large, pot for our 2 pepper plants. We are growing jalepenos and habanero peppers, spicy! The first batch was finally ready to be picked and here we have it:


Since Ryan loves all things extra spicy, I made him some pepper jelly from the peppers. It was my first experience making a jelly, I've only made jams up until now. So easy! I used the recipe straight from my Better Homes & Gardens cookbook in the "preserves" section. It's sweet and spicy, I think it would actually be pretty tasty on some grilled chicken or pork.


Craft club is this week and I'm so looking forward to it! I think I will use that time to finally start me and Ryan's Christmas stockings. Hope you have a great week!