

Today I want to give a huge welcome to Astrid over from Red Red Completely Red. I was first drawn to Astrid's blog a while back by her Scandinavian style, felt-work, and unique projects (she's done some super amazing stuff with chalkboard paint!). She also makes these adorable "Travelling Tillberries," softies made from recycled items like sweaters and potato sacks. My personal favorite is the fox!
Astrid's grandfather (Morfar) is a watercolor artist who taught Astrid to add red to all true works of art. Astrid fully embraces this and tries to have a bit of red in everything she creates.
Astrid's Danish heritage comes from her mother's side, her Mormor being from Denmark. She lived in Sweden when she was little, and later lived in Denmark for 4 years. Needless to say, she is enthusiastic about keeping her Danish heritage alive, especially at Christmastime!
Our home is rather red for most of the year anyway, but when it comes time for Christmas, we go to the extreme. Red felt hearts draped across the fireplace, red paper cones on the tree, little red birdhouses outside, and hanging in front of the windows, red paper cuts in festive shapes.

Decorating with these beautiful, delicate paper cuts was always a tradition I enjoyed growing up. My Mum, who really kept the Danish culture alive for us, had a lovely collection of cuts featuring scenes with little Nisse boys and girls going sledding, kissing under a tree, and doing all sorts of jolly activities. We would unwrap them, very carefully, and invite them all to join us for Christmas.
This year, for the first time, I decided to make my own paper cuts. And with just a few simple materials, you can easily add a couple to your home this year, too.
What you'll need:
Several sheets of paper (scrapbook paper works very well)
A craft knife, or pair of scissors
A needle
White thread
Assorted bowls, lids, and decorations to draw around
I like to make paper cuts with a little round border around them. First, we'll make that border. Place a (largish) bowl upside-down onto a sheet of paper.

Either cut around it with a craft knife, or draw around it with a pencil and then cut it out.

You should now have a circular shape.

Now, find a slightly smaller bowl. (Jar lids, drinking cups, and embroidery hoops all work well, too!) Place it in the middle of the first circle, and again, cut around it.

The size of your border will depend, of course, on the bowls you use. But luckily, paper cuts look great when a variety of circles are used together, so experiment with different sizes!

Now, we'll cut out the shapes to go inside the border. I love the simplicity of hearts. Here, I'm using a cookie cutter as a template, but you could use whatever is handy... or draw your own.

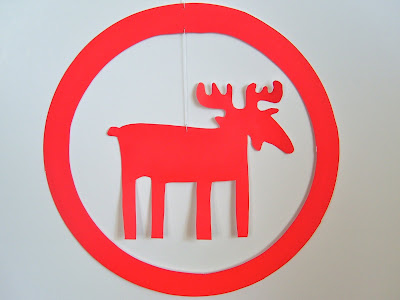
Christmas ornaments are also good templates. This year's IKEA reindeer took my fancy. With complicated shapes, it's easier to draw around the shape first, and then cut it out.

Now that you have a border, and something to go inside it, all you need to do is string them together. Thread a needle with thin white thread...

And poke it through the paper, about 1/2 cm from the edge (too close and it will rip easily). Pull the thread through almost all the way, leaving a little tail.

Tie a couple of knots, using the thread on both sides of the hole. Trim the excess thread on the tail, but leave a long strand of thread attached to the needle. You can then repeat this process, sewing your shape to the border.

And get creative with your shapes! Although I didn't feel quite up to freehand drawing any Nisse this year, it was very simple to draw a little fish shape, to make a unique paper cut. Perfect for anyone you know who loves pickled herrings!

A huge thank you to Astrid from Red Red Completely Red! I have to get busy and make some pickled herring paper cuts! :)
How fun! That looks like a really nice easy little craft to do now in the last few days before Christmas!
ReplyDeleteI would never have attempted to make a paper cut but the moose looks so good I think I might try it. Thanks for the inspiration.
ReplyDeletei really like the modern simple look of this!
ReplyDeletep.s. thank you for visting my blog and commenting on my baby Jesus in a walnut shell post. :)