Wednesday, February 29, 2012

Apple Butter

Well, Fuji apples were on super sale here in California this past weekend so I bought 5 pounds with hopes of either baking or canning with them.  Canning won out.  It was a toss-up between making apple butter or Swedish apple cake (this is amazing if you have yet to try it...), and since I haven't canned anything in a while I went with making the apple butter.

I discovered apple butter later in life, I think sometime around college (back in the early 2000's), and have never looked back.  There are many variations from very basic (just apples) to very spicy.  I decided to go the spicy route this time around.  I even threw in a 1/4 teaspoon ground cardamom for the heck of it.


The one drawback of making fruit butters in the amount of time it takes.  Peeling, chopping, slicing, heating, simmering, and simmering....and simmering.  It seriously feels like it simmers f-o-r-e-v-e-r.  Since you really want a thick consistency it takes quite a bit of time (especially with juicier fruits like peaches or pears) to evaporate most of the liquid until you're left with a very spreadable and edible butter.  But, it's totally worth it.


In non-butter related news, it's been a grand week thus far.  A good friend just moved closer, my pepper plants have made a triumphant return after I was certain they were dead, I finished reading the Hunger Games series (amazing!!!), and to top it all off today is Leap Day!

Sunday, February 26, 2012

DIY: Yogurt

Who else can't believe that February is almost over?  2012 is seriously flying by... 

I don't make resolutions for the New Year, but I do make a little list in my mind of things I want to do more of. And this year one of those things was to make more home dairy products.  I acquired this little gem of a book, Home Dairy, which gives detailed instructions and helpful tips for making all kinds of your own dairy.  I've already tried cheese and butter, and today I tackled yogurt.

It's so simple that I have a feeling this will be a repeated project every few weeks.  I never want to buy yogurt again!  

Here is how I made it...


Recipe:
slightly adapted from Home Dairy

4 cups whole, low-fat, or skim milk (I used skim)
3 Tablespoons live yogurt (make sure the container says it contains "live, active cultures") 
Or in place of the live yogurt you can use 1 packet dried yogurt culture.  


Heat the milk until it almost reaches boiling, about 180 degrees Fahrenheit.  A candy thermometer is very useful here. 


Remove milk from the heat and let cool until 110 - 115 degrees F.  Add 3 Tablespoons prepared yogurt or your dried yogurt culture.  I let my prepared yogurt come to room temp while I heated and cooled the milk before adding it.


Once fully incorporated, pour into glass jars.  I used recycled jars from pasta sauces, well washed of course.


Once in jars or containers for storing, let the yogurt temperature stay between 110 - 115 for about 6 hours.  I preheated my crockpot on low, then added the glass jars and secured the lid, and then turned the crockpot off.  This should give your yogurt a warm place to culture for the next 6 hours.  

Other methods include pouring the yogurt into a thermos, in a cooler with jars of hot water, or in a preheated but off oven.


Refrigerate and use within 1-2 weeks.  

Note: Homemade yogurt tends to be thinner in consistency than its store-bought counterpart.  If you prefer your yogurt to have a thick consistency, try adding 1 tablespoon unflavored gelatin in the first step while heating your milk.  Or you can also try adding dry powdered milk, 3-4 tablespoons during the first step.

Wednesday, February 22, 2012

A cute little face

Now doesn't that make a Wednesday so much better?  I think so.


Sunday, February 19, 2012

No Bake Energy Bites

I'll be the first to admit it, ever since I joined Pinterest, I can't stop!  It's amazing the amount of inspiring little bits that are just floating around in the Pinterest world.   When I stumbled upon these no-bake energy bites I knew I would have to give them a go.  And I did.  And they are amazing.  


No Bake Energy Bites

1 cup rolled oats
1/2 cup peanut butter (or other nut butter)
1/3 cup honey
1 cup flaked coconut
1/2 cup raisins
1/2 cup course cracked wheat (or flaxseed)

Combine all ingredients thoroughly and refrigerate for 30 minutes.  Roll into small balls and enjoy!  So easy, quick and great for snacking.  Yum.


What's great about these is you can really mix it up and try different add-ins each batch you make.  I did raisins and cracked wheat this time, but want to try mini-chocolate chips and dried cherries.  I think that would be a delicious combo for these little bites!

Hope you all enjoyed your weekend!  And if you have President's Day off tomorrow, enjoy that too! :)

Thursday, February 16, 2012

Little by little

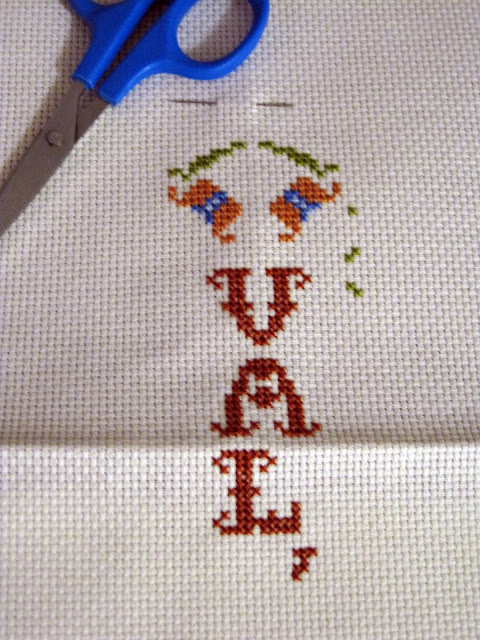
Here is my progress from my latest cross stitch project.  Slowly but surely it's coming together.  I just need to start the border then finish up the edges. 


In other crafty-related news, I plan on heading over to the Little Knittery this afternoon to pick up some new roving and check out their yarn selection.  It will be my first time checking the shop out but it comes highly recommended from many other crafty folk here in LA.

Tuesday, February 14, 2012

A dress for a baby

First, Happy Valentine's Day!  Hurry for a day dedicated to eating chocolate and getting flowers!  I know I will definitely be eating my fair share of sweets today, I hope you do too.

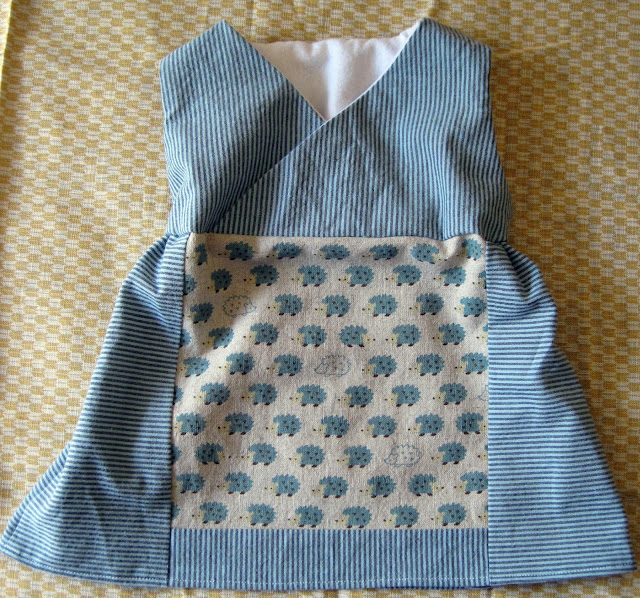
Ok, back to sewing and crafting.  I made this wee little baby dress from Anna Maria Horner's book, Handmade Beginings, the dress is called the Pretty-as-a-Picture Dress.  A number of our friends are having babies in the near future and I thought I'd get a head start on some baby gifts! 

It uses one fabric to showcase the design in both the front and back of the dress.  I had this adorable porcupine fabric that I found in Japan and figured this would be a great use for it!


Back view: You can see how the elastic around the waistband (except for the front panel) gives the dress some cute gathers.


Front view:


And side view:


This was a great day project.  I started it in the morning and finished after lunch, with many coffee breaks in between.  I am loving Handmade Beginings, it has adorable projects for every aspect of parenthood: from diaper bags to maternity clothes to baby toys, a great range of things to create.

And if you're looking for a fun Valentine's day craft try making your own paper hearts with this tutorial:


Happy Chocolate Valentine's Day!

Monday, February 13, 2012

A birthday pie

A love a good pie.  And when you don't feel like a birthday cake, a pie is a great replacement desert.  I had been wanting to try this new recipe for pecan pie anyway, so I gave it a go and my is it delicious.  My only complaint is that I should have covered it with foil mid-baking time as it got a little too brown around the edges for my liking.


Pecan Pie

4 cups pecan halves
4 large eggs, lightly beaten
1 cup packed brown sugar
1 cup light corn syrup
1/2 cup (1 stick) unsalted butter, melted and cooled
2 tablespoons pure vanilla extract
1/2 teaspoon salt
1 pie crust (I used a store-bought dough since I was on a time crunch...)

Fit your pie crust in a 9-inch pie plate. Flute edge and refrigerate until firm, about 30 minutes.

Preheat oven to 325 F.  Set aside 1 1/4 cups of the pecan halves; coarsely chop remaining 2 3/4 cups pecans.  Stir together eggs, sugar, corn syrup, butter, vanilla and salt until well combined.  Add chopped pecans.  Pour into prepared pie shell and arrange the reserved pecans halves on top in concentric circles until completely covered.

Bake until filling is just set and crust is golden brown, about 70 minutes (recipe says 90 but mine was definitely done by 70). Let cool completely before serving.


And in addition to the birthday pie, I made some birthday creme brule tartlettes!  I got mini-tartlette rings for Christmas and needed to try them out. They work wonderfully and look adorable.  Mini things are just so cute.


 Happy Monday!

Wednesday, February 8, 2012

A little stitchery

I recently picked up a cross stitch project from my mom's old stash.  It's yet another "Valkommen" ("welcome" in Swedish) bell pull hanging.  I really like the colors in this one: rust, greens, and blues.  


I've been having an unintentional crafting break these past few weeks.  It just sort of happened, or rather, didn't happen.  So I've decided that I need to be a little more intentional about getting my craft on.  Starting....now.


In other news, I just hopped on the Pinterest bandwagon.  Quite inspirational stuff on there, hopefully it will inspire some projects!

Sunday, February 5, 2012

Quick wedding recap

Ryan and I have been married for [almost] 8 months! Woo!  I never got around to posting any of our pics so here is a quick recap of the day.

All of our ceremony pictures were done by the wonderful John of J. Stuart Photography


Ceremony 


Unity candle lighting


First kiss as husband and wife!

Hitched!


Cutest flower girl ever


A few outdoor pics


The bridal party


Love Ryan's face


Getting on our getaway "car"


And we're off


Success.


Our reception photos were taken by Ryan's groomsman and good friend, Roger Metcalf.

Cake time!


Dancing with the cutest niece ever.


And the cutest nephew ever, in the cutest little suit ever.


Dancing with the hubs, the dancing machine.


Love.


We had a wonderful day celebrating with all of our friends and family.  We are so thankful to everyone who participated, helped, and traveled to celebrate with us on our special day.