Showing posts with label Christmas. Show all posts

Thursday, September 22, 2016

Christmas is around the corner!

It's about this time of year when I start getting Christmas on the brain. Yes, I'm definitely one of those people who watch Christmas movies unacceptably early and start listening to Amy Grant come October (ok ok, I've already listened to her Christmas album once...). I just love Christmas time.

Since we had Astrid, it's been really fun talking about what kinds of traditions we want to have as our own family of 3. We always are traveling to our respective families homes for the actual day, but for the past few years we celebrate just us on New Years Day. I love waking up at home and drinking coffee by our tree. It's the BEST! And now it's even more exciting that Astrid is in the mix. I think she will be really into everything Christmas this year, including the cookies!

In the spirit of Christmas soon approaching, I decided to do some prelimary "research" on what cookies to make this year. So I bookmarked some new Swedish cookies I haven't made before and decided to bake and eat my way through them to see which ones would make the cut for this year's Christmas. It's tough work, but someone has to do it. 

First, I baked these Almond Spice cookies from the famous Swedish cookbook Swedish Cakes and Cookies (or Sju Sjorter kakor in Swedish). I love a good spice cookie in wintertime and these didn't disappoint. Be warned though, they are subtly spicy, not like gingerbread or pepperkakor. They only contain cinnamon and cardamom for the spices - one of my favorite spice combos!


Ready for fika!


I really enjoyed the texture of both the ground almonds in the cookies, and the pearl sugar on top. And don't worry, I didn't eat the entire place of cookies.


Verdict: I liked them! Especially warm from the oven. After I bake through more recipes, I'll do a final verdict of what makes the Christmas Cookie list for 2016 - these are definitely a contender!

Swedish Almond Spice Cookies
3/4 cup butter
3/4 cup sugar
1 egg
2 1/4 cups flour
2 teaspoons baking powder
1 teaspoon cinnamon
1 teaspoon ground cardamom
2/3 cup ground almonds (I used blanched, slivered almonds and gave them a quick grind in my food processor)
Garnish with pearl sugar 

Preheat oven to 400. Beat butter and sugar until light and fluffy, add egg. Combine remaining ingredients and add, kneading lightly. Form into small balls and roll in pearl sugar and place on a greased baking sheet. Bake for 10-12 minutes.

Notes: I found 10 minutes was perfect - the bottom of these cookies seemed to brown quickly. I would check them early. They didn't stick to the pearl sugar easily when I rolled the balls in; I had to gently push the sugar into the dough. If you don't have pearl sugar, I'm sure regular sugar would suffice  but you'd miss out on the crunchy texture that it offers. If you have a local IKEA you can check their pantry section - they used to carry it in the past at ours, but I haven't seen in there in about a year now.

Happy Fika-ing! :)

*This post may contain affiliate links, but all opinions remain my own

Saturday, December 13, 2014

Scandinavian Christmas: Day 1


Hello and welcome to the very first day of Scandinavian Christmas!!! If you're new to the series, let me explain. Each year, kicking off on St. Lucia day (today!), I invite various bloggers/friends/relatives to do a guest post here at the Pickled Herring that highlights a fun Scandinavian Christmas tradition, craft, or recipe. I'm so excited about this year's series and hope you enjoy all the posts as much as I do! Let's get started!

Today I will be sharing a fun craft tutorial to get the series started. Then tomorrow be sure to come back to hear from one of my favorite bloggers out in blogland, Pam!

As you may already know, I had the Swedish Christmas Market/Lucia Craft Fair this past weekend and it went great! One of the new additions this year were these tomte wine toppers:


They are so cute and simple, and pretty fun to make too. They make an ordinary bottle of wine festive and fun to give away as a gift!

Let's get started! Gather your supplies:

100% wool roving - I buy mine from the Village Spinning and Weaving shop in Solvang (also available in much smaller quantites at a craft store like Michael's)
Felt in your choice of color
Thread
Hot glue gun + glue
Either a small wooden bead, or felting needle to make nose

First, sew your tomte hat. Fold a piece of felt in half and sew a line across in a triangle, mine was about two inches across at the bottom. Trim and turn inside out.


Try it on for size on your bottle.


Get the nose ready. If you needle felt, use a small piece of pink or flesh roving to make a small ball. Alternatively, you can use a small wooden bead or whatever you'd like that looks nose-like.


Break off a 3-4 inch piece of roving, depending on how full and long you'd like your tomte beard to be.


Load up the roving with hot glue - you want a lot on there. Secure firmly to the hat on the inside.


Optional: glue another piece of felt over the inner section of the tomte beard. I do this part if the beard is especially full, just to ensure it stays glued onto the hat section.


Add the nose with hot glue.

 Decorate your glögg and wine bottles and skål!


And here is a glimpse of the cutest Viking Santa around! Ryan was my hero at the craft fair last weekend and wore this amazing Viking Santa costume to help draw traffic to the booth. It sure worked - he was a huge hit!


And in the honor of St. Lucia Day being today, I'm offering all Lucia Paper Dolls buy one get one free here on Etsy! Just send the message, "Scandinavian Christmas" with your order! [PayPal now accepted]


Monday, March 3, 2014

Sister Crafting Project 2014

Caryn and I had our first official 2014 Sister Crafting Day meeting back in February (it's already March?!) and we've decided on our project for the year - Christmas stockings!

I received a plethora of fun crafting books for Christmas last year, and there were quite a few patterns to choose from. In the running was this Julbock stocking pattern from Swedish Handknits (also where I got the crayfish hot pad pattern I knitted recently):

[photo credit: Just Crafty Enough]

The pattern we ended up choosing is from the book, Scandinavian Needlecraft:

[photo credit: Katy Elliot blog]

I really like the heart one with the tulip border on top. Plus the snowflake one is cute too, all very Scandinavian looking, which was obviously top priority. :) I was even thinking of making the reindeer one into a Julbock instead for Ryan's stocking.

We haven't actually started making them yet, but picking out a pattern and drinking coffee counts as a craft day in my book.

In other news, our apartment is almost completely unpacked! It's a March miracle! We still need to put up some artwork to brighten it up, but it feels good to have things out of boxes and where they belong. 

Have a great week!


Friday, January 17, 2014

2014

Happy New Year, everyone!!! 2014 is going to be a grand year! 

Christmas was a blast! We got a good taste of the snowy coldness of Michigan: 


Drank plenty of glögg and ate delicious, homemade pickled herring.


Watched Christmas Vacation and had some eggnog in a moose cup.


Got to hang out with my bestie and finally got to meet this cutie pie!


And I was able to finish the sheep baby blanket I've been working on forever for this little dude! (sorry for the terrible photo)


All in all, we had a raging good time. We had quite a good 2013 and I'm excited for what 2014 has in store!


Friday, December 20, 2013

Scandinavian Christmas: Day 8

  
Welcome to Day 8! Today I'm so excited that my sister, Caryn, is joining in the Scandinavian Christmas fun this year! I'm so thankful that Caryn and I live close enough to hang out and craft together - we've had a lot of fun craft days this year! Today she will be sharing our year-long advent calendar project that we finished just in the nick of time for Christmas! 

Hi everyone! I am Kathryn’s sister, Caryn, who you might have seen on a few previous blog posts throughout this year. I am mostly Swedish with some Norwegian and a smattering of English and French…but my Swedish heritage wins out! I am a busy mom of two little ones, but in an effort to keep my sanity, I try to get together with Kathryn once a month and work on a Swedish themed craft.


I have fond memories as a kid of my mom each year hanging up an Advent calendar that held miniature candy canes. It was always one of those decorations I couldn’t wait to see hung in its usual place on the wall, and while my three sisters and I would have to wait until our “assigned” day to eat our candy cane, it was always fun to watch the candy canes disappear, the days ticking by, getting closer and closer to Christmas. 

Last Christmas was my first Christmas with two kids—Hannah was just three months and Noah two years old. And while they were still a little young to eat candy canes, I found myself wishing I had an Advent calendar to hang up. Hence the one-Saturday-per-month crafting days began. 

Before I begin, I should preface everything by saying that I was NOT the brains behind this project (despite being the older and wiser sister—hee hee). While I may have brought the idea up to Kathryn, it was more of a “I have no idea how I would even begin doing something like this…can you help me?” kind of idea. To which she graciously obliged and held my hand through it all. So if you have any specific questions on how anything was done—ask her. :-)

We began by researching calendar layouts and patterns…and drinking lots of coffee. We decided we wanted to do something Scandinavian looking (obviously), with little pockets to hold candy canes. We also decided coffee was essential to our success.

Next came time to buy our fabric. This took a few “sessions” to figure out because we wanted to pick out a few different patterned fabrics that all had similar shades of red. This was a little more difficult to do at some of the more commercial fabric stores, so we took a trip down to the fabric district in downtown LA. Success! We found multiple different fabrics that we loved and couldn’t wait to start.

We began by cutting, ironing, and hemming the pockets that we were going to sew onto our linen background. This is when I received my first lesson on using the sewing machine!
It was so much fun! And yes, I will admit there was some truth to Kathryn’s previous blogging—I did talk to myself while sewing…and in my learning and experimentation I did do a “free willy” move or two. :-) Kathryn was a great teacher, and she bailed me out on a number of occasions when I got in a jam. It was so much fun to be able to start visualizing the calendar taking shape at this point.

It then came time to sew everything on to the backing. This is where I slowed down our progress…with my slow, newly learned sewing skills. :-) We took turns sewing on the pockets, and while Kathryn could sew five pockets across in about 15 minutes, I probably took an hour or more to do the same, with a few crooked hem lines to show for it...but I DID IT! We (mostly Kathryn) then stenciled the God Jul on the linen, and sewed everything together. Project complete—candy canes in! Let the
countdown begin!

God Jul! (Oh, and Kathryn, what project are you helping me with next year?)

So glad Caryn and I completed our calenders in time! I had such a fun time working on it throughout the year and I can't wait for our 2014 project!

Come back tomorrow to hear from my bestie, Jessica!

Thursday, December 19, 2013

Scandinavian Christmas: Day 7


Today we get to hear from KJ who blogs over at the super creative and fun blog Let's Go Fly A Kite! KJ has an entire section on her blog with fun craft projects to do with kids, be sure to check it out! KJ shared her awesome recipe last year for kransekake, and is back this year to share a tutorial for how to make the most adorable little Lucias!

Hello there! I’m KJ and I live in Toronto, Canada.  I have been blogging as a hobby for a few years.   I like to post about the  crafty messes that we make at let’s go fly a kite. For the past few years, I have joined Pickled Herring’s Scandinavian Christmas.   My paternal side is Norwegian and I like to include Scandinavian traditions in our family’s Christmas celebrations.

IMG_4241
That’s me on the Flåm Railway (Flåmsbana), Norway 2010
In November, my daughters and I attended a St. Lucia pageant at Toronto’s annual Swedish Christmas Festival.  They wanted to add to their miniature St. Lucia doll collection, so that was the impetus for this project which uses recycled wine corks.
IMG_7221
To make a wine cork St. Lucia, you will need a few supplies:

Body and head: one cork painted white and  a 1 inch wooden bead (you can paint the bead if you wish) 
Crown : green and gold wired trim or pipe cleaner
Sash: thin red ribbon
Candle:   A thumbtack and glue a  5mm yellow bead on top,
Hands: two 6 mm wood beads.
Hot glue

The figure’s construction is based on a traditional wine cork angel.  
Paint the cork white.  Hot glue the wooden bead to the cork, but offset the bead slightly so that the bead’s hole becomes the mouth. 

Next add the crown.  Cut a piece of green to the desired size and cut the candle trim to the desired size.  This is a little fidgety to assemble, but if you use wired trim or  pipe cleaner it should work.  I glued the candles first and then the added the green trim.

Next, glue the sash, thumbtack and beads.   The yellow bead is glued to the thumbtack’s sharp point.  
I added a wooden button to the base of the cork, but this is optional.   Sketch on the placement of the eyes in pencil first then go over with a permanent marker.
IMG_6553

I also added a gold trim loop to my dolls to hang on the tree or to place on a bottle of Glögg!

IMG_7225

Thanks so much for visiting Scandinavian Christmas  today,  God Jul!

I absolutely love these little guys and can't wait to make my own set! Thank you, KJ for sharing such a fun tutorial! Tomorrow we will hear from my dear sister, Caryn!

Tuesday, December 17, 2013

Scandianvian Christmas: Day 5


Today on Day 5 we're welcoming back Erica! Erica is married to my cousin Sten and they just welcomed a sweet baby girl to their family! I love following Erica's blog and getting a window into how she adds Scandinavian flair to her holidays and daily life - she is so creative! She shared her delicious almond cookies last year, and rosettes the year before. I'm thrilled she's back for a third year and will be sharing some scrumptious Swedish meatballs!

God Jul and Swedish Meatballs


I'm so excited to be a guest blogger for Scandinavian Christmas 2013! I couldn't decide what to share this year, until I took a look at my Advent Calendar and today was: Make a Swedish Meatball Dinner. Perfect. Swedish Meatballs can be enjoyed at anytime of the year, however, on this cold snowy day in Wisconsin with the Christmas lights lit, I feel it screams Christmas!


I have a 3 month old (Lucy), so I needed a recipe I could prep while she was napping and this is a perfect "make ahead" meal. I adapted a few different recipes to make my own based on what I had on hand.
Sten and I enjoyed this after Lucy went to sleep. I hope you'll enjoy this meal as well!

For the meatballs:
1.25 lbs Ground Turkey
1/2 onion, chopped (I used red)
 2 tsp. dried parsley
1 egg beaten
1/4 cup bread crumbs
1/2 tsp black pepper
1 tsp salt
1/4 tsp nutmeg
1/4 tsp cloves

Combine all meatball ingredients together in a bowl, mix thoroughly by hand being careful not to over-mix. Using a Tablespoon make 24-27 meatballs and place evenly spaced on a greased cookie sheet.
Cook at 350 for 18-20 minutes.

Gravy:
1 (15oz) can beef broth
1/2 C milk or cream (I used soy milk bc Lucy has a milk alergy)
1/4 C lingonberries
2 T corn starch
4 T cold water

 Combine lingonberries, broth and milk in a saucepan. Bring the liquid mixture to a simmer. Combine the cornstarch with the 4 tablespoons cold water. Whisk the cornstarch mixture into the sauce mixture while it is simmering. It will begin to thicken after adding the cornstarch. Continue to simmer until sauce is a gravy-like consistency.
_____

While the meatballs were in the oven I prepped my potatoes

Roasted Potatoes:
5-6 yellow potatoes, peeled and quartered
2 cloves minced garlic
2 T olive oil
Dill
pepper
salt

Combine ingredients and roast at 450 for 40 mins.


If you too are in need of a "make ahead meal" follow these instructions: after I cooked the meatballs and added them to the gravy, I stuck the saucepan in the fridge. I prepped the potatoes so I could just throw them on the baking sheet and in the oven prior to eating while the meatballs and gravy were warming back up.

This meal was delicious and nutritious. Sten said to me: they taste like Tre Kronor- our favorite Swedish restaurant in Chicago! So glad it showed up on my Advent calendar so I could share it! I hope you can cozy up with someone you love dearly and enjoy this warm comfort meal.

God Jul from my family to yours!


xo,
Erica

Huge thanks to Erica for participating again and come back tomorrow to hear from Nancy!


Monday, December 16, 2013

Scandinavian Christmas: Day 4


Welcome to day 4, everyone! I'm super excited about today's post - not only is it about pickled herring, but it's brought to us by my Dad! My Dad dabbles in a number of artsy areas, including woodworking, painting, and cooking. This is his second year participating in the Scandinavian Christmas series - last year he shared his delicious cardamom bread recipe. I'm so glad he's back to share this delicious pickled herring recipe!

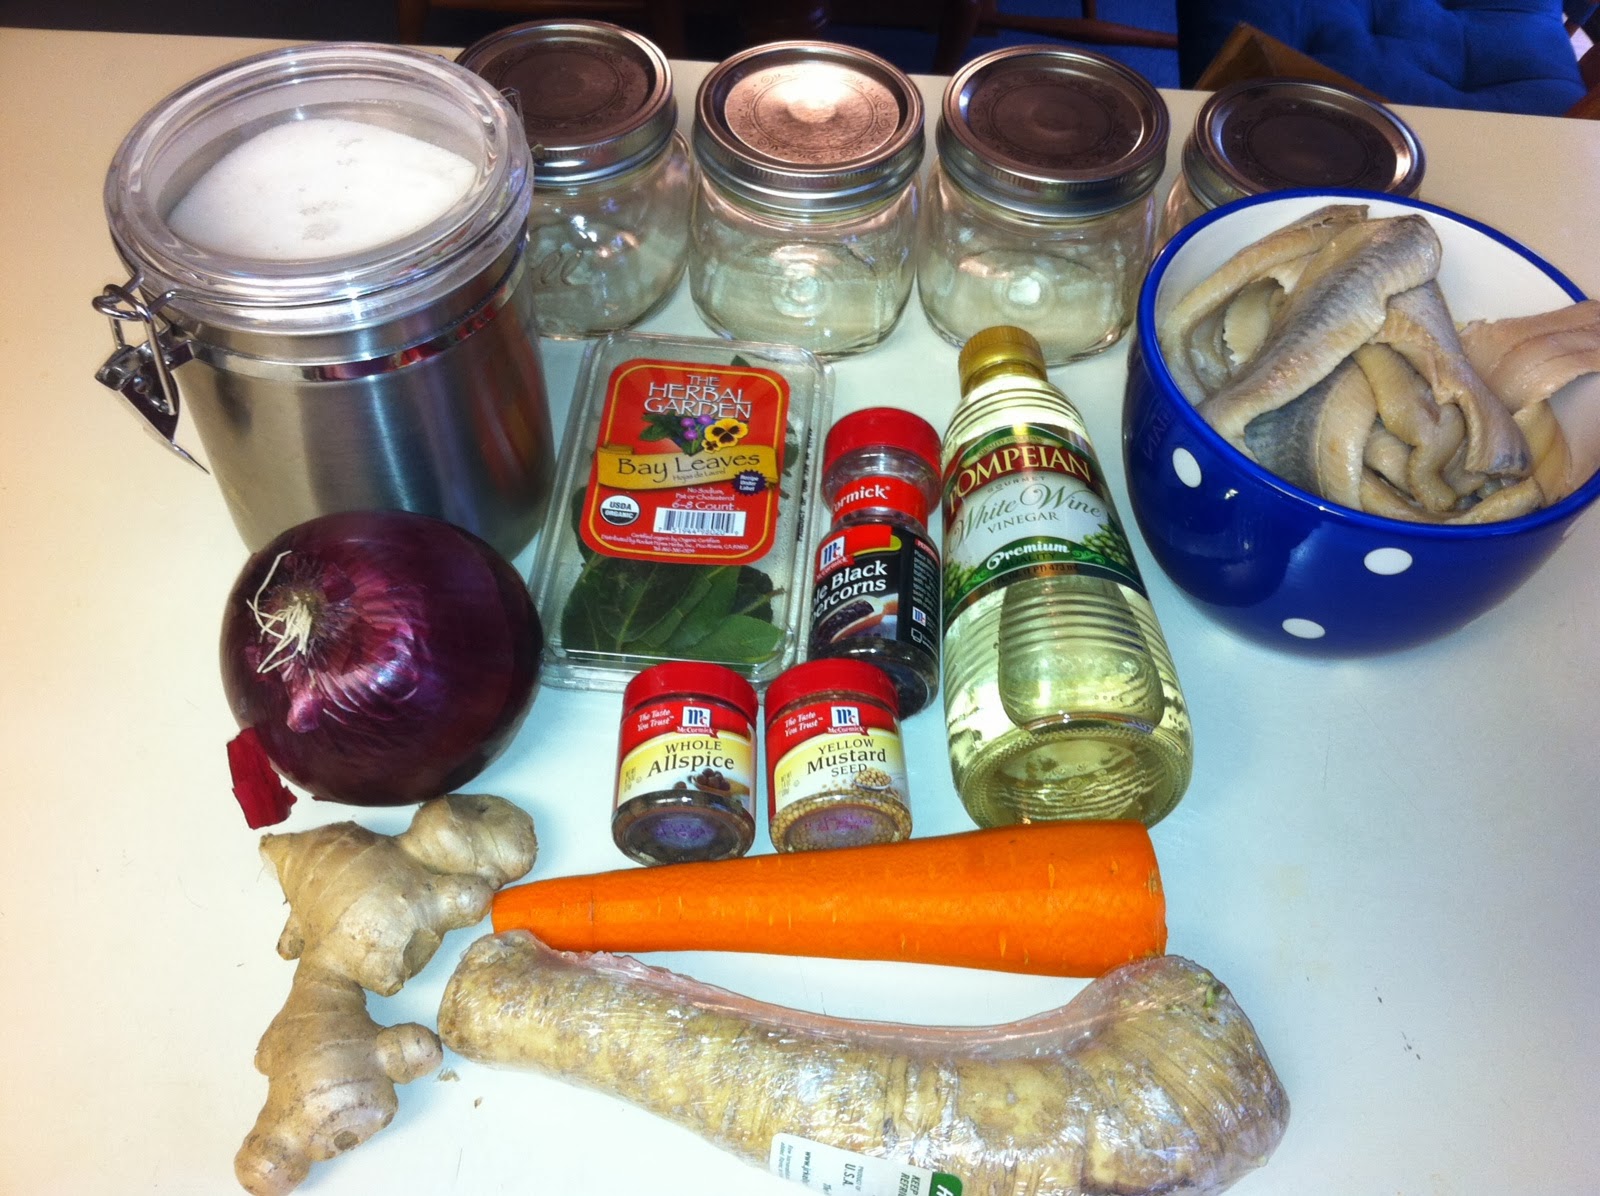
Hi, I’m Kathryn’s Dad, Mark, and this is the second year that I have been privileged to contribute to Kathryn’s Scandinavian Christmas series. This year I would like to share with you my friend, Ken Johnson’s recipe for Glasmastarsill (Glazier’s Sill). While this in not something that we did when Kathryn was young, it is a new tradition for us now. The recipe follows:


Glasmastarsill

1 ½ pounds herring fillets 
1 ½ inch piece of horseradish root 
1 medium carrot 
2 medium red onions

1 ½ inch piece of ginger root
2 tsp whole allspice
2 tsp whole yellow mustard seeds
2 to 3 bay leaves
2 tsp whole black peppercorns

Pickling Liquid:
2/3 cup of white wine vinegar
½ cup of water
½ cup of sugar

Clean and fillet herring. Skin if you want to. Soak herring in cold water overnight to desalt it. ( 8 hours )


Combine ingredients of pickling liquid and heat to dissolve sugar and let cool to room temperature. This is important as the herring will be mushy if not cooled to room temperature. Cut herring into bite sized pieces. 


Thinly slice horseradish root, carrot, ginger root, and red onion. Layer herring and sliced vegetables in jar, sprinkling with spices as you go. Pour in sufficient pickling liquid to Cover. Refrigerate for at least a week before eating. Will keep refrigerated for months but best if eaten within a few weeks.


Thanks again, Kathryn for this opportunity to be a part of your Scandinavian Christmas series. It is so much fun to see your creativity and skill. At this festive time of year, let us all remember the true meaning of Christmas and “may God bless us, everyone.”

Thanks, Pops! I can't wait to eat some of this stuff  in less than two weeks! 
Come back tomorrow to get another tasty Scandinavian recipe from Erica!

Tuesday, December 10, 2013

Kickoff to Christmas!

Well folks, it happened! Ryan and I were able to fit our little tree into our little apartment! And I love it! We have many more ornaments this year than we did last, so our tree looks a little more lively than years past. I love the string of Danish woven heart lights that I got from IKEA last year. I only wish I had gotten more than 1 strand...alas. Overall, it's a great little tree and it makes our apartment feel very Christmas-y.


Coming up this weekend, I have my last craft fair of the season! The Lucia fair of Los Angeles is this Sunday, December 15, downtown at the Shrine Expo Center. Come join in the fun! There will be craft booths, a Lucia processional, glögg, and much more!

And last, but not least, this Friday kicks off St. Lucia Day and the 2013 Scandinavian Christmas series!! We will be hearing from all sorts of fun guest bloggers and participants this year! Stay tuned! :)