Friday, December 30, 2011

Hitting the road


Ryan and I are off to San Francisco for the long weekend!  I will be taking a brief blogging break for the next week or so.  I wish you all a very happy new year, happy 2012!


Photo taken by our wonderful photographer, John.

Sunday, December 25, 2011

Scandinavian Christmas Round-up


God Jul / Merry Christmas!  

Thanks for joining in the fun of Scandinavian Christmas!  Here is a list of all the recipes and crafts that were featured these past 12 days, be sure to check them out!


Day 1: Tutorial for a Lucia crown card
Day 2: Pam's recipe for Palaeg Choklad
Day 4: Helena's tutorial for Danish Woven Hearts
Day 5: Karin's tutorial for Swedish Smallkarameller
Day 6: Rachel's tutorial for a Dala Horse Crown
Day 7: Astrid told us all about Nisse
Day 8: Birgitte showed us how to make heart ornaments
Day 9: Ryan's (my hubby!) recipe for Swedish glogg
Day 10: Erica's recipe for Norwegian rosettes
Day 11: Margit's recipe for Rice Pudding

Have a very merry Christmas!

Saturday, December 24, 2011

Scandinavian Christmas: Day 12


It's the twelfth day of Scandinavian Christmas! A huge thank you to everyone who participated in making this series so much fun!  I will be posting a round-up and recap of all the participants and projects tomorrow (Christmas Day, woo!).  I thought it only fitting to end the series again with a new recipe for pickled herring.  If you didn't already know, I love herring.  For our Christmas Eve dinner we always have a full Swedish smorgasbord, complete with at least 3 (this year 5) different kinds of herring.  Today I will share a recipe for one of my favorite kinds - mustard herring.

Last year for the Scandinavian Christmas series we were lucky to have Pernilla share her own pickled herring recipe here.  I love the red onion in it.


This year I found an amazing recipe from Leila's blog.  Her blog is all about recipes and books, you have to make sure you check it out, stat!  It is also full of great photos and recipes, Swedish mustard herring being one of them.

photo from Leila

The recipe for Swedish Mustard Herring is found here on Leila's blog.  She writes clear and concise directions for the recipe that are easy to follow.  If you've never tried pickled herring before, now is your chance! 

Merry Christmas Eve!

Friday, December 23, 2011

Scandinavian Christmas: Day 11


Scandinavian Christmas, Day 11 - woo! I hope you all have been enjoying the series as much as I have.  It is been so much fun to see what everyone has to share.  There have been so many great crafts and recipes this year and I can't wait to try them out!  Today Margit is graciously sharing her wonderful rice pudding recipe with everyone.  

Rice pudding
 
2 liter whole milk/full cream milk
250 g/0,50 pound pudding rice
1 coffespoon salt
 
Heat the milk until it boils. Add the pudding rice, then stir with low heat, when it is just boiling put lid on it, but it has to be stirred often. This lasts for an hour, and then add the salt.
Served warm with sugar and cinnamon and a lump of butter in the middle.

PastedGraphic-3.tiff


It is a tradition, to place a bowl with rice pudding some deserted place: under the roof or in the stables for the “nisse”.


 And it is a tradition to put an almond into the bowl when it is served, the person who gets the almond wins a present. The present is very often a little pink pig made of marzipan.

There are several ways to cheat, the most common is that the person who gets the almond hides it in their cheek, and looks very innocent, suspiciously innocent, or that you look very innocent without the almond, and the whole family suspect one another to be in possession of it.

Another way to cheat is to make sure that the children get the almond and to have a present that is fitting for a child. My grandmother once served an almond in every portion, and the whole family sat around the table looking very innocent.

Instead of eating it hot, you cool it and add vanilla, sugar and almonds cut in slices, It is not supposed to be too sweet. Instead of cherry sauce you can use other berries for the sauce.

The name risalamande sounds french, but it is never heard about in france, there is a Swedish variety: Ris a la malta, as far as I now there are small pieces of  tangerines from a tin  in it.

Merry Christmas,
Margit

Thursday, December 22, 2011

Scandinavian Christmas: Day 10


Welcome to Day 10!  I can't believe the series is just about over!  If you're just joining the fun, this Scandinavian Christmas series has been all about Scandinavian Christmas traditions, recipes, and crafts shared by some very creative and talented bloggers out there.  If you have any Scandinavian Christmas photos you'd like to share, add them to the Flickr group here.  Today we will be hearing from Erica, my cousin Sten's wife.  She is an amazing cook, baker and comes up some creative decorating ideas and shares all about her adventures over at her blog here.  Today she will show us how to make these tasty Norwegian treats!


I am excited to share a Scandinavian tradition with you today! My Grandparents are from Norway and my Grandma happens to be an excellent baker. Growing up my mom remembers Christmas traditions centering around Norwegian cooking and baking. My dad is Italian, so growing up we managed to mix the two, but here is one of the great Scandinavian specialities --Rosettes!

A Rosette is a thin, cookie-like, deep-fried, pastry of Scandinavian origin. Rosettes are traditionally made during Christmas time with intricately designed irons. The iron is heated in oil, then dipped in the batter, then re-immersed in the oil to create a crisp shell around the metal. Usually, the edges of the rosettes are then dusted with sugar. 

My mother received her Rosette set from an elderly woman at our old church. I love the box it came in, and the years of cookie making memories! It only cost $4.00 back in the day! 


There are very few ingredients, and if you can get your hands on one of the irons, I think you should definitely give the recipe a try!

2 eggs
1 T Sugar
1/4 t salt
1 C Flour
1 C Milk
1 t vanilla

Beat eggs, sugar, salt. Add remaining ingredients and beat until smooth.
Heat Rosette iron in deep, hot, oil 350-375 for 2 minutes. 


 Drain excess from iron. 
Dip in batter to 1/4 inch from top of iron, then immediately into hot oil.Fry until golden brown 10 seconds. 


Lift out, tip upside down to drain.With fork, push Rosette off iron onto rack placed over paper towels.  Reheat iron, repeat.Stir batter from time to time (because it will get oil into it)Sprinkle with powdered sugar.


Enjoy! 


There is nothing I love more than baking with my mom. It will always be one of my favorite things. She has taught me everything I know in the kitchen and I am grateful for her heritage and the Scandinavian recipes that are now a part of our lives.

Thank you Pickled Herring for this opportunity to share this with you all!

God Jul,
Erica

Wednesday, December 21, 2011

Scandinavian Christmas: Day 9


Today I get to introduce you all to my husband, Ryan!  As I'm sure you already know from when I've written about him before that he is one heck of a nice fellow.  He is currently in grad school and spends most of his time writing, seeing movies and drinking cold coffee (ew).  Today he is here to share about how we met and how a little something Scandinavian was involved.


Prior to December 2008, my exposure to Scandinavian culture was limited to plastic trolls with neon pink hair, the Norway pavilion at Epcot, and IKEA.   I mean, I knew the basics.  Scandinavia is cold.  And the region’s major cultural export of the past fifty years was ABBA.  But aside from that, my knowledge was limited.

My vested interest in Scandinavia took a dramatic leap forward in December 2008 when I met this Swedish girl at a Christmas party.  She began talking about a Swedish mulled wine called glogg.  I immediately feigned interest in order to make a good impression.

I got her number, friend-requested her on Facebook, and then we both went back to our respective homes for Christmas.  I wanted to stay in the forefront of this girl’s mind over the two-week break, so I hatched a plan.  I was going to make glogg for my family.

So I called her.  I asked her all about glogg.  What spices should I put in it?  What kind of wine?  What year?  What brand?  How much?  Either she thought I was some dude who was seriously into mulled wine, or she could see through my veneer and knew I liked her.  No matter what, I was talking to her.

And now I’m married to her.

And we just celebrated her birthday with a glogg party.

Looking to impress a Swedish girl this holiday season?  Use this glogg recipe…the one Kathryn gave me over the phone.


Delicious Glogg
1 bottle red wine
1 bottle brandy
1 cup cranberry juice (or water would work too)
1 orange, sliced and zested
2 cinnamon sticks
10 cardamom pods
5-10 whole cloves
1/2 cup raisins
1/2 cup almonds (not roasted or salted)
1/2 - 1 cup sugar (depending on your sweetness taste)
chopped almonds and raisins for serving

First, put your cranberry juice in a large pot on the stove.  Add all the spices, sugar, raisins, and orange. Bring to a boil then reduce to a simmer and let the spices steep for 15 minutes (or allow to sit overnight).  Add your almonds, wine and brandy.  Heat through and serve in glogg mugs which are small and cute.  Add fresh almonds and raisins in your mug right before drinking.

Tuesday, December 20, 2011

Scandinavian Christmas: Day 8


Today marks day 8 of Scandinavian Christmas, it's flying by and Christmas is practically here!  Remember to add your photos to the Scandinavian Christmas 2011 Flickr group here to join in the fun! Today we get to hear from a wonderful Danish blogger, Birgitte.  She blogs over at SewDanish where she shares a variety of crafts that focus primarily on Danish textile art.  She also has a great Etsy shop here where she makes a range of crafty items from handmade gift tags to origami Christmas stars.  Today she is here to share with us how to make these cute Danish heart ornaments!  To start, I asked her a few questions so we could get to know her a little more...


1. What is your Scandinavian heritage? 

I’m a 100% native Dane spending the first 3 ½ decades of my life living and working in Denmark. While working aboard, I met my American husband and for quite some years we have been living in England, which makes it very easy to nip over to Denmark to visit family and friends.
Usually we celebrate Christmas with my family in Copenhagen which is always a lovely time. Copenhagen is so beautifully decorated at Christmas time and it is such a special treat strolling the pedestrian zone in the city center, just taking in the lights and atmosphere.

2. What's your favorite Christmas cookie?

Oh that is a difficult one! I love the Danish traditional Christmas cookies and always bake between 3-5 different kinds during the month of December. Danish Christmas cookies are generally a lot smaller and very crisp compared to the huge American soft chocolate chip cookies.  I often try to add a new recipe and currently one of my newcomers is my favorite. It is a small round cookie baked with fresh orange rind and decorated with dark chocolate. Yummy.

3. What your favorite type of craft to do (knitting, sewing, embroidery...etc...)?

Over the years, since early childhood, I have touched base with a huge amount of techniques. I’ve always been crafting and creating things. Currently I’m exploring the borderline between art quilting and contemporary machine (free style) embroidery throwing in a bit of mixed media.
I belong to a contemporary textile art group called. ‘Fibrefusion’ where we are always working towards exhibition deadlines resulting in several machine and hand stitching  projects on the go. For mindless relaxing I do love a spot of either knitting or crocheting.


HAPPY GO EASY CHRISTMAS HEARTS

As a child my mother every year got my sister and I to make Christmas ornaments in the weeks leading up to Christmas. We had little store bought ornaments and I believe that my appreciation for unique handmade ornaments started there. I cannot help designing and making Christmas ornaments, and being able to list them in my Etsy shop: SewDanish has been great.  I love making the old Danish/Scandinavian traditional ornaments with an updated twist as well as designing new.

I developed the technique for the Christmas ornaments, when I was having fun experimenting and making samples for Fibrefusion' recently published book ‘Muslin’, which an inspirational and experimental work book about creating lovely fiber art using thin, inexpensive, loose weave fabrics. 
Start by layering 10 -12 layers of muslin/calico/turbin cotton in approx. 6 x 8 inch (15 x 20 cm) oblong. The muslin can be any colour you like.
If choosing white/off white you have the option of coloring the hearts after stitching.

Draw 2 hearts (or any other simple shape) on a piece of cartridge paper or ‘stitch and tear’. Don’t cut out. Pin the pattern along the 4 edges of the muslin bundle.
If stitching the hearts free hand on the machine, you may skip drawing a pattern.
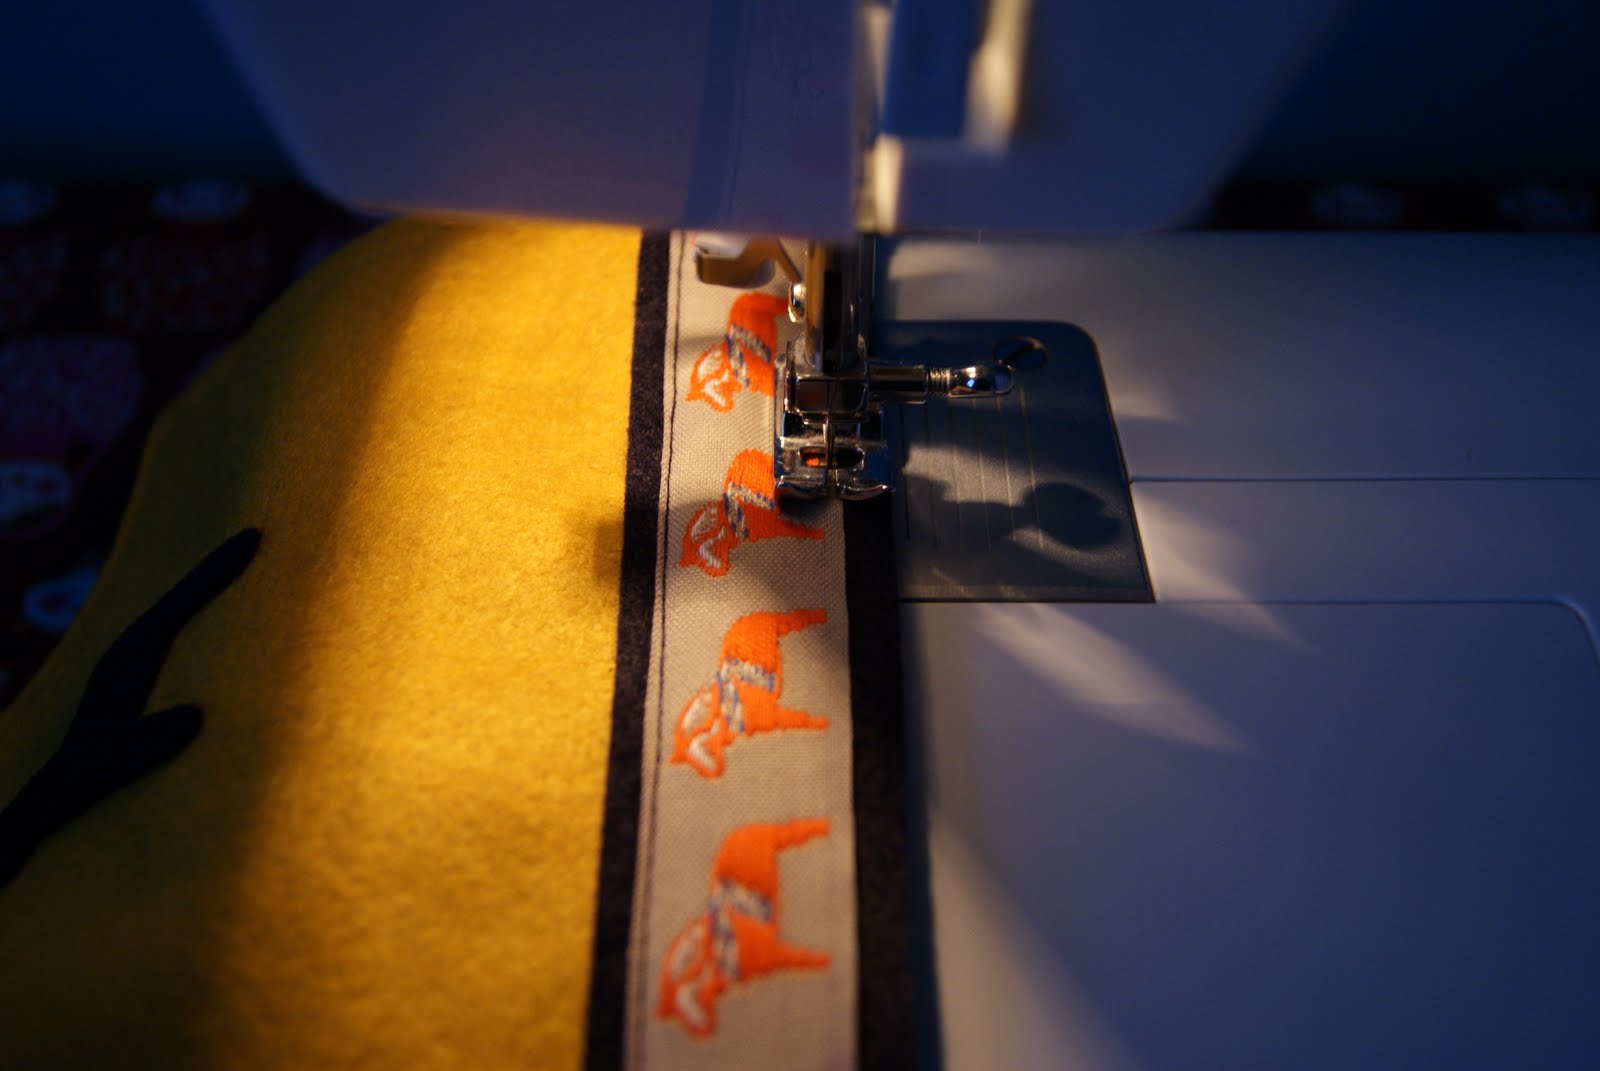
Thread your sewing machine and stitch the hearts either by following your pattern or drawing the  shape in free motion on your machine.
When free motion stitching lower the feed dogs, release the top thread tension and zero the stitch length. Now you are in control of moving the fabric creating the stitched lines.
OR you can leave your machine ‘normal’ with the feed dogs up, normal top tension and stitch length 2.5 – 3. Both will work.
I prefer free styling it for a more relaxed look, but have a play and see what suits you.

Stitch, following your first out line, by going over it at least 4 times. You can stitch these bands as wide or as narrow as you like. The stitch lines need to be very close and partly on top of each other.  Now repeat these stitch lines inside the heart. Depending on the size of the heart repeat  once or twice (or more). 


Remove your fabric from the machine. With a pair of scissors cut very close along, but not into, the outermost stitched band.


 Now look at your heart and decide what areas you would like to cut away between the stitched lines. The aim is to create higher and lower areas. With a fine pointed pair of scissors carefully cut through only the 5-6 top layers of muslin. It is easier to cut a few layers at the time than doing it all in one go.


The heart can now be further embellished with hand embroidery and or beads. Add a piece of string, twine, raffia or ribbon to hang your hearts.


If you aren’t too keen on the slightly raw, frayed edges, you can seal the edges with a bit of acrylic paint like shown on the stars.

These stars have a different look to the hearts, as they were sewn on white muslin/calico and dyed afterwards. The stars were then embellished with hand embroidery and the surface was ever so lightly dry brushed with acrylic paint for added texture.


Please note the boring bits:


These instructions are for personal use only. You are however welcome to use a single photo and a brief description , linking them back to where you came across the instructions.
The instructions may not be republished in their entirety without the permission of me, the author, Birgitte Hendricks. I can be contacted through my blog http://SewDanish.blogspot.com 

A huge thank you again to Birgitte for sharing this great tutorial!  Be sure to stop by her blog and take a look around her Etsy shop!


Monday, December 19, 2011

Scandinavian Christmas: Day 7


Today we welcome Astrid over from Red Red Completely Red.  Her blog is full of many things I love, especially things Scandinavian.  She has a fantastic Etsy shop with adorable felted items and the cutest personalized embroidery hoops you will probably ever see.  Astrid is quite talented at what she does and I am excited that she is here today sharing all about the mischievous Nisse!


Growing up, our family's Danish roots were always particularly evident at Christmas. Perhaps it's because the Scandinavians have such a great sense of style in their decorations, or such tasty pepparkaker, but so many of the Christmas traditions I continue with my family come from the Danes. One of these is the existence of nisse (or tomte to some) -- the cheeky little red elves who, legend has it, deliver the presents.


Last year, I set friends and family a little Christmas Challenge, to channel their mischievous inner nisse, and cover their neighbourhoods in Christmas hats. We had a lot of fun dressing up all of the stone lawn ornaments around here, and really enjoyed a cheeky new take on Christmas spirit -- 'good' deeds done anonymously, under the cover of darkness!


This year, no more mischief is needed in our house. One-and-a-half year old Tilly is our resident nisse, and loves creating as much good-humoured trouble as she can. Our hoard of stuffed snowmen "magically" move about the house now, and often surprise me by waiting outside of doors. Every day items like keys and watches disappear, and then turn up later, hanging from the Christmas tree. (So it's no wonder we're always late to everything!)


For us, the nisse bring out the playful side of the Christmas season, and help us strike a balance between not doing enough to make the celebration special, and taking the festivities too seriously. A little or prank or two -- which can, of course, be blamed on the nisse -- make for lots of funny family memories!


I hope those cheeky nisse pay a visit to your home this Christmas. Remember, a little treat left out for your nisse ensures he stays happy and doesn't cause any real trouble!

Sunday, December 18, 2011

Scandinavian Christmas: Day 6


Today we welcome back Rachel, from Nest Full of Eggs, to share how to make an adorable Dala Horse felt crown.  Rachel's blog is full of wonderful ideas relating to craft, gluten-free life, and fun projects for kids.  She has been featured in various magazines and always comes up with clever ideas!  I am so thankful that Rachel is participating in this series again and sharing such a one-of-a-kind Scandinavian gift for the Christmas season.  I am definitely making one of these for next Christmas for my niece!  


Here's how to make a Dala horse felt crown for dress-up ~ a handmade Christmas gift for that special child in your life.

Supplies needed:

2 coordinating colors of wool blend felt (I used mustard yellow & navy blue)
5 inches of elastic (I used 3/4 inch wide elastic)
9.5 inches by 2.5 inches piece of coordinating cotton fabric
large & small Dala horse cookie cutters
16 inches Dala horse ribbon
matching thread
sewing machine


What you do:

With some paper, trace the Dala horse cookie cutters & cut them out, these will be your templates & use those to cut out Dala horses from the navy blue felt.


Also from the navy blue felt I cut a 16 inch by 1.25 inch piece to go under the inch wide Dala horse ribbon.


From the mustard yellow felt cut 2 pieces that are 16 inches by 7 inches, shape the top how you want it to look (I made 3 points).

With the front crown piece sew the Dala horses on, next sew the front and back crown pieces together (I started a couple inches up from the bottom & I didn't sew the bottom together as the bottom will be sewed together when the ribbon is sewn on).


Now sew the ribbon with navy felt behind it to the bottom of the crown.


Next it's time to sewing the elastic casing, fold the cotton fabric in half lengthwise & sew .25 inch seam, turn right side out, thread the elastic through the casing. 


Take each end of elastic w/casing & tuck it in between the 2 layers of felt about .5 inch, then zig zag stitch all those layers together.


There you have a felt crown with a Scandinavian touch.


Have a Merry Scandinavian Christmas !


Thank you, Rachel, for this fun tutorial!  Be sure to pop over to Rachel's blog, Nest Full of Eggs, and check out her post about Nordic Christmas Decorations!

Saturday, December 17, 2011

Scandinavian Christmas: Day 5


Today I am quite excited to welcome another fantastic Swedish blogger, Karin.  I just discovered Karin's fun and creative craft blog, Nordic Craft, a couple months ago and was so pleased that she agreed to participate in this series!  Today she is sharing a fun tutorial for adults and kids alike (or adult kids too!) to spread a little Scandinavian Christmas cheer.

When Kathryn approached me about writing a guest post for her “Scandinavian Christmas” series, I immediately dropped what I was doing and started jotting down ideas for Christmas crafts and topics. It was harder than you’d think! After all, I’ve never thought much about “Scandinavian Christmas” –to me it’s just “Christmas”! After some thinking, I decided to share a tutorial for a Christmas craft that most Swedish children (and adults!) will be familiar with, and that you can find in most Swedish homes this time of year: Smällkarameller! These tree decorations are a (less noisy) version of the Christmas crackers so popular in the UK, but I have yet to spot them on a Christmas tree anywhere outside Scandinavia. Made of simple materials and easy to customize to your heart’s content, they can be made by anyone from 4 years and up. If your child can handle a pair of scissors, they can make these!


Image by BfloMom on Flickr

Once I decided what to make, there was another problem – getting decent photographs! As you can imagine, living this close to the Arctic Circle presents some unique challenges… In December, the sun doesn’t rise until 8 am here, and it starts getting dark around 2.30. Not a lot of natural light for my photography! I hope you’ll forgive the quality of the photos – and if anyone wants to contribute some frequent flyer miles for a trip to the Bahamas, drop me a line!

Tutorial: Smällkarameller / Christmas Crackers


What you’ll need:
-         An empty toilet paper roll
-         2 coordinating sheets of tissue paper (roughly 50x50 cm / 20x20 inches)
-         A piece of string or ribbon (about 45 cm / 18 inches)
-         Sharp Scissors
-         A couple of paper clips
-         Pencil
-         Clear tape


Start by laying your tissue paper sheets on the table, one on top of the other. The color you place at the bottom will be the one that shows on the outside of your ornament. Use the paper clips to keep the tissue paper from shifting around while you are working. Center your toilet roll at the bottom of the tissue paper and mark the sides with a pencil.

Start by folding one side of the tissue papers towards the center by about 1 cm (1/3 inch). Run your finger along the edge to make a sharp crease. Keep folding back and forth in an “accordion” manner. Don’t worry too much about making perfectly even folds – this will not be visible later on!  Accordion fold the paper until you get to the mark you made with your pencil.  Put a paper clip around your folded edge to keep the “accordion” together.

Fold the opposite side of the tissue paper in the same manner, until your paper looks like this:

Lay the toilet roll in the middle of the paper to make sure you have left enough of the paper unfolded. Now, get your scissors and start cutting the folded sides into “fringes” about ¼ inch (1/2 cm) wide. Be careful not to cut too far into the unfolded part of the tissue paper! You can make the fringes slightly wider or narrower according to your tastes, but this is the width I like best.

Once you have cut fringes in both ends of your tissue paper, place your toilet roll in the center and roll the paper around it, securing the end of the paper with a piece of tape. Next, separate the fringes from each other and “fluff” them out, being careful not to tear the tissue paper. Shake your ornament a little to fluff it up properly!

At this time, you can choose to place a little treat or sweet inside the cracker. Some families like to stick a little something inside, and then tear the ornaments apart when the tree is taken down after Christmas. Since I’m planning to reuse my ornament next year, I left it empty. After you fill the cracker (or if you decide not to), tie the ends of the string around each end of the cracker for hanging. If you’re using solid colored tissue paper, you can choose to decorate the front of your ornament with a sticker or some glitter. All done!!

It’s easy to vary these ornaments by using different colors of tissue paper, different sized cardboard rolls and embellishments. They can be used without strings to decorate the dinner table or hung in a window. Fair warning though: they can be a bit addictive to make!

 A big thank you again to Karin for sharing this fun project and participating in the Scandinavian Christmas series!